
UE4的Texture生成和原理浅分析
Texture的读写生成
读取:UE 实现读取本地系统图片为 UTexture2D
通用方法
本方法在 编辑器 和 GamePlay 模式下都可行,支持的图片文件格式有 PNG, JPEG, BMP, ICO, EXR, ICNS, HDR, TIFF, DDS, TGA,基本能覆盖大部分的常用图片类型。
代码也很简洁:
#include <Engine/Texture2D.h>
#include <ImageUtils.h>

UTexture2D* LoadImage(const FString& InLoadPath)
{
    FImage ImageInfo;
    FImageUtils::LoadImage(*InLoadPath, ImageInfo);
    return FImageUtils::CreateTexture2DFromImage(ImageInfo);
}
返回的即是 UTexture2D。
编辑器专用方法
本方法可以额外支持更多的图片类型:UDIM 纹理贴图、IES 文件、PCX 、PSD。
代码实现上会更复杂一些:
#include <Engine/Texture2D.h>
#include <Misc/FileHelper.h>
#include <Misc/Paths.h>
#include <UObject/UObjectGlobals.h>

#if WITH_EDITOR
UTexture2D* LoadImage(const FString& InLoadPath)
{

    TArray64<uint8> Buffer;
    if (!FFileHelper::LoadFileToArray(Buffer, *InLoadPath))
    {
        return nullptr;
    }

    const FString TextureName;
    const FString Extension = FPaths::GetExtension(InLoadPath).ToLower();
    const uint8* BufferPtr = Buffer.GetData();

    auto TextureFact = NewObject<UTextureFactory>();
    UTexture2D* Ret = Cast<UTexture2D>(TextureFact->FactoryCreateBinary(//该函数使用了GEditor
        UTexture2D::StaticClass(), GetTransientPackage(), *TextureName, RF_Transient,
        NULL, *Extension, BufferPtr, BufferPtr + Buffer.Num(), GWarn));

    return Ret;
}
#endif
实现是使用了 UTextureFactory 的 FactoryCreateBinary 函数,这个函数能够读取前面提到的额外文件类型。
复制:UE 实现复制 UTexture2D
有的时候需要复制一个 UTexture2D 出来,再对这个复制出来的图片进行修改,复制图片需要使用到引擎自带的函数 FImageCore::CopyImage,只要设置好两个图片的参数,调用这个接口即可
UTexture2D* CopyTexture2D(UTexture2D* InTexture, UObject* Outer, FName Name, EObjectFlags Flags)
{
    // src texture info, src ImageView
    FTextureMipDataLockGuard InTextureGuard(InTexture);//参考D:\UE_5.4\Engine\Source\Runtime\Core\Private\AutoRTFM\LockGuard.h可实现此效果
    uint8* SrcMipData = InTextureGuard.Lock(LOCK_READ_ONLY);        // Texture->GetPlatformData()->Mips[0].BulkData.Lock(InLockFlag)
    const int32 InSizeX = InTexture->GetSizeX();
    const int32 InSizeY = InTexture->GetSizeY();
    const EPixelFormat InFormat = InTexture->GetPixelFormat();
    const FImageView SrcMipImage(
        SrcMipData, InSizeX, InSizeY, 1, GetRawImageFormat(InFormat), InTexture->GetGammaSpace());

    // create dst texture
    UTexture2D* NewTexture = NewObject<UTexture2D>(Outer, Name, Flags);
    NewTexture->SetPlatformData(new FTexturePlatformData());
    NewTexture->GetPlatformData()->SizeX = InSizeX;
    NewTexture->GetPlatformData()->SizeY = InSizeY;
    NewTexture->GetPlatformData()->SetNumSlices(1);
    NewTexture->GetPlatformData()->PixelFormat = InFormat;

    // Allocate first mipmap.
    int32 NumBlocksX = InSizeX / GPixelFormats[InFormat].BlockSizeX;
    int32 NumBlocksY = InSizeY / GPixelFormats[InFormat].BlockSizeY;
    FTexture2DMipMap* Mip = new FTexture2DMipMap();
    Mip->SizeX = InSizeX;
    Mip->SizeY = InSizeY;
    Mip->SizeZ = 1;
    NewTexture->GetPlatformData()->Mips.Add(Mip);
    Mip->BulkData.Lock(LOCK_READ_WRITE);
    Mip->BulkData.Realloc((int64)NumBlocksX * NumBlocksY * GPixelFormats[InFormat].BlockBytes);
    Mip->BulkData.Unlock();

    // dst texture ImageView
    uint8* DstMipData = static_cast<uint8*>(NewTexture->GetPlatformData()->Mips[0].BulkData.Lock(LOCK_READ_WRITE));
    const FImageView DstMipImage(
        DstMipData, InSizeX, InSizeY, 1, GetRawImageFormat(InFormat), InTexture->GetGammaSpace());

    // run CopyImage
    FImageCore::CopyImage(SrcMipImage,DstMipImage);

    //下面有提及
#if WITH_EDITORONLY_DATA
    NewTexture->Source.Init(
        InSizeX, InSizeY, 1, 1,
        FImageCoreUtils::ConvertToTextureSourceFormat(GetRawImageFormat(InFormat)), DstMipData);
#endif

    // cleanup
    NewTexture->GetPlatformData()->Mips[0].BulkData.Unlock();
    NewTexture->UpdateResource();

    return NewTexture;
}
保存:UE 实现保存 UTexture2D 到文件
核心是使用引擎函数 FImageUtils::SaveImageAutoFormat,实现起来比较简单,不过需要注意失败重试的情况
void SaveImage(UTexture2D* InImage, const FString& InSavePath)
{
    if (!InImage) return;
    FImage ImageInfo;
    if (FImageUtils::GetTexture2DSourceImage(InImage, ImageInfo))
    {
        FImageUtils::SaveImageAutoFormat(*InSavePath, ImageInfo);
    }
    else
    {
        // D:\UE_5.4\Engine\Source\Runtime\Core\Private\AutoRTFM\LockGuard.h
        //相当于void* MipData = InImage->GetPlatformData()->Mips[0].BulkData.Lock(LOCK_READ_ONLY);
        FTextureMipDataLockGuard InImageGuard(InImage);

        uint8* MipData = InImageGuard.Lock(LOCK_READ_ONLY);
        check( MipData != nullptr );

        const FImageView MipImage(
            MipData, InImage->GetSizeX(), InImage->GetSizeY(), 1,
            GetRawImageFormat(InImage->GetPixelFormat()), InImage->GetGammaSpace());

        //Save an image. Output format will be chosen automatically based on the Image pixel format eg. EXR for float, PNG for BGRA8 extension will be added to file name
        FImageUtils::SaveImageAutoFormat(*InSavePath, MipImage);
    }
}
保存:UE 实现保存 UTexture2D 到 Asset
保存内存中的 UTexture2D 到 Asset 中,并可以在资源浏览器 (Content Browser) 中查看。
核心函数需要用到上面实现的 CopyTexture2D,我们需要先复制出来一个新的图片,然后再调用 UPackage::SavePackage 把图片所在的 Package 保存成 Asset。
void SaveTextureToAsset(UTexture2D* InTexture)
{
    if (!InTexture) return;

    // open save asset dialog, choose where/which to save
    FSaveAssetDialogConfig SaveAssetDialogConfig;

    SaveAssetDialogConfig.DefaultPath =  FEditorDirectories::Get().GetLastDirectory(ELastDirectory::NEW_ASSET);
    SaveAssetDialogConfig.AssetClassNames.Add(UTexture2D::StaticClass()->GetClassPathName());
    SaveAssetDialogConfig.ExistingAssetPolicy = ESaveAssetDialogExistingAssetPolicy::AllowButWarn;
    SaveAssetDialogConfig.DialogTitleOverride = FAIChatPlusEditor_Constants::FCText::SaveAsAsset;

    const FContentBrowserModule& ContentBrowserModule = FModuleManager::LoadModuleChecked<FContentBrowserModule>("ContentBrowser");
    const FString SaveObjectPath = ContentBrowserModule.Get().CreateModalSaveAssetDialog(SaveAssetDialogConfig);

    if (SaveObjectPath.IsEmpty()) return;

    // init save info
    const FString PackageName = FPackageName::ObjectPathToPackageName(SaveObjectPath);
    const FString PackageFileName = FPackageName::LongPackageNameToFilename(PackageName, FPackageName::GetAssetPackageExtension());
    const FString PackagePath = FPaths::GetPath(PackageFileName);
    const FString TextureName = FPaths::GetBaseFilename(PackageName);

    // create new UPackage to put the new texture in
    UPackage* const NewPackage = CreatePackage(*PackageName);
    NewPackage->FullyLoad();//可有可无

    // copy texture
    UTexture2D* NewTexture = UAIChatPlus_Util::CopyTexture2D(
        InTexture, NewPackage, FName(TextureName), RF_Public | RF_Standalone | RF_Transactional);

    //没有此操作其实也有图像显示的
    // Generate the thumbnail
    // if not doing so, the texture will not have thumbnail in content browser
    FObjectThumbnail NewThumbnail;
    ThumbnailTools::RenderThumbnail(
        NewTexture, NewTexture->GetSizeX(), NewTexture->GetSizeY(),
        ThumbnailTools::EThumbnailTextureFlushMode::NeverFlush, NULL,
        &NewThumbnail);
    ThumbnailTools::CacheThumbnail(NewTexture->GetFullName(), &NewThumbnail, NewPackage);

    // setting up new package and new texture
    NewPackage->MarkPackageDirty();
    FAssetRegistryModule::AssetCreated(NewTexture);
    //和上面相呼应SaveAssetDialogConfig.DefaultPath =  FEditorDirectories::Get().GetLastDirectory(ELastDirectory::NEW_ASSET);
    FEditorDirectories::Get().SetLastDirectory(ELastDirectory::NEW_ASSET, FPaths::GetPath(PackageName));

    //也可以不自动保存
    // save args
    FSavePackageArgs SaveArgs;
    SaveArgs.TopLevelFlags = RF_Public | RF_Standalone;
    SaveArgs.bForceByteSwapping = true;
    SaveArgs.bWarnOfLongFilename = true;

    // save it
    if (!UPackage::SavePackage(NewPackage, NewTexture, *PackageFileName, SaveArgs))
    {
        UE_LOG(AIChatPlusEditor, Error, TEXT("Failed to save Asset: [%s]\n"), *PackageFileName);
    }
}
剪贴板:UE 实现复制图片 (UTexture2D) 到 Windows 剪贴板 (Clipboard)
应该还需要Windows的SDK但我还没试过这个方法
Windows 相关函数
我们会用到以下 Windows 操作剪贴板的相关函数:
- OpenClipboard:打开剪贴板,获取剪贴板的 Handler 。
- EmptyClipboard:清空剪贴板,并把剪贴板的所有权分配给当前的窗口。
- SetClipboardData:设置剪贴板的数据,图片的数据是通过这个接口发送给剪贴板。
- CloseClipboard:设置好数据之后,关闭剪贴板。
剪贴板的图片格式
标准剪贴板格式 里面介绍了可用的剪贴板格式,其中 CF_DIBV5 即可以用来设置图片。
CF_DIBV5 要求的格式具体定义 BITMAPV5HEADER 结构,在这里我们选用以下配置
BITMAPV5HEADER Header;
Header.bV5CSType        = LCS_sRGB;
Header.bV5Compression   = BI_BITFIELDS;
UTexture2D 设置
我们在上面选择了剪贴板图片的颜色空间是 LCS_sRGB,即 sRGB 颜色空间,那么 UTexture2D 也需要先设置到对应的格式:
bool ConvertTextureToStandard(UTexture2D* InTexture)
{
    if (InTexture->CompressionSettings != TC_VectorDisplacementmap)
    {
        InTexture->CompressionSettings = TC_VectorDisplacementmap;
        IsChanged = true;
    }
    if (InTexture->SRGB != true)
    {
        InTexture->SRGB = true;
        IsChanged = true;
    }
    if (IsChanged)
    {
        InTexture->UpdateResource();
    }
}
ConvertTextureToStandard 就是负责把 UTexture2D 转换成标准格式:TC_VectorDisplacementmap (RGBA8) 和 SRGB 颜色空间。对齐了 UTexture2D 和 Windows 剪贴板的图片格式之后,我们就可以把图片的数据复制到剪贴板上。
具体代码
void CopyTexture2DToClipboard(UTexture2D* InTexture)
{
    if (!InTexture) return;

    FTextureMipDataLockGuard InTextureGuard(InTexture);
    // get InTexture info
    uint8* SrcMipData = InTextureGuard.Lock(LOCK_READ_ONLY);
    const int32 InSizeX = InTexture->GetSizeX();
    const int32 InSizeY = InTexture->GetSizeY();
    const EPixelFormat InFormat = InTexture->GetPixelFormat();
    const FImageView SrcMipImage(
        SrcMipData, InSizeX, InSizeY, 1, GetRawImageFormat(InTexture), InTexture->GetGammaSpace());

    // set clipboard Texture info
    const EPixelFormat OutFormat = PF_B8G8R8A8;
    const int32 NumBlocksX = InSizeX / GPixelFormats[OutFormat].BlockSizeX;
    const int32 NumBlocksY = InSizeY / GPixelFormats[OutFormat].BlockSizeY;
    const int64 BufSize = static_cast<int64>(NumBlocksX) * NumBlocksY * GPixelFormats[InFormat].BlockBytes;

    // set header info
    BITMAPV5HEADER Header;
    Header.bV5Size          = sizeof(BITMAPV5HEADER);
    Header.bV5Width         = InSizeX;
    Header.bV5Height        = -InSizeY;
    Header.bV5Planes        = 1;
    Header.bV5BitCount      = 32;
    Header.bV5Compression   = BI_BITFIELDS;
    Header.bV5SizeImage     = BufSize;
    Header.bV5XPelsPerMeter = 0;
    Header.bV5YPelsPerMeter = 0;
    Header.bV5ClrUsed       = 0;
    Header.bV5ClrImportant  = 0;
    Header.bV5RedMask       = 0x00FF0000;
    Header.bV5GreenMask     = 0x0000FF00;
    Header.bV5BlueMask      = 0x000000FF;
    Header.bV5AlphaMask     = 0xFF000000;
    Header.bV5CSType        = LCS_sRGB;
    // Header.bV5Endpoints;    // ignored
    Header.bV5GammaRed      = 0;
    Header.bV5GammaGreen    = 0;
    Header.bV5GammaBlue     = 0;
    Header.bV5Intent        = 0;
    Header.bV5ProfileData   = 0;
    Header.bV5ProfileSize   = 0;
    Header.bV5Reserved      = 0;

    HGLOBAL WinBuf = GlobalAlloc(GMEM_MOVEABLE, sizeof(BITMAPV5HEADER) + BufSize);
    if (WinBuf == NULL)
        return;

    HWND WinHandler = GetActiveWindow();
    if (!OpenClipboard(WinHandler)) {
        GlobalFree(WinBuf);
        return;
    }
    verify(EmptyClipboard());

    // copy InTexture into BGRA8 sRGB Standard Texture
    FTexture2DMipMap* DstMip = new FTexture2DMipMap();
    DstMip->SizeX = InSizeX;
    DstMip->SizeY = InSizeY;
    DstMip->SizeZ = 1;
    DstMip->BulkData.Lock(LOCK_READ_WRITE);
    uint8* DstMipData = static_cast<uint8*>(DstMip->BulkData.Realloc(BufSize));
    const FImageView DstMipImage(
        DstMipData, InSizeX, InSizeY, 1, ERawImageFormat::BGRA8, EGammaSpace::sRGB);

    FImageCore::CopyImage(SrcMipImage,DstMipImage);
    DstMip->BulkData.Unlock();

    // copy Standard Texture data into Clipboard
    void * WinLockedBuf = GlobalLock(WinBuf);
    if (WinLockedBuf) {
        memcpy(WinLockedBuf, &Header, sizeof(BITMAPV5HEADER));
        memcpy((char*)WinLockedBuf + sizeof(BITMAPV5HEADER), DstMipData, BufSize);
    }
    GlobalUnlock(WinLockedBuf);

    if (!SetClipboardData(CF_DIBV5, WinBuf))
    {
        UE_LOG(AIChatPlus_Internal, Fatal, TEXT("SetClipboardData failed with error code %i"), (uint32)GetLastError() );
    }

    // finish, close clipboard
    verify(CloseClipboard());

    delete DstMip;
}
UTexture的简介
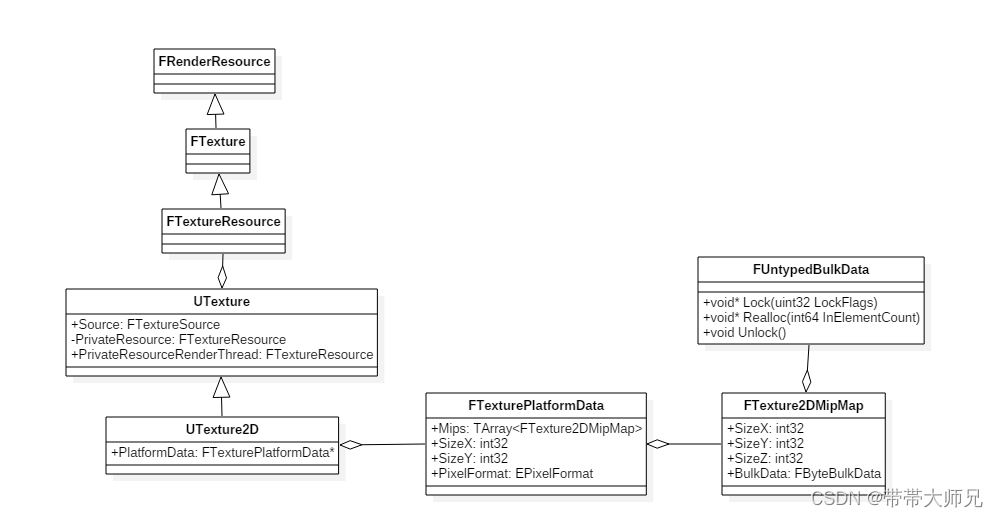
Texture的FTextureSouce
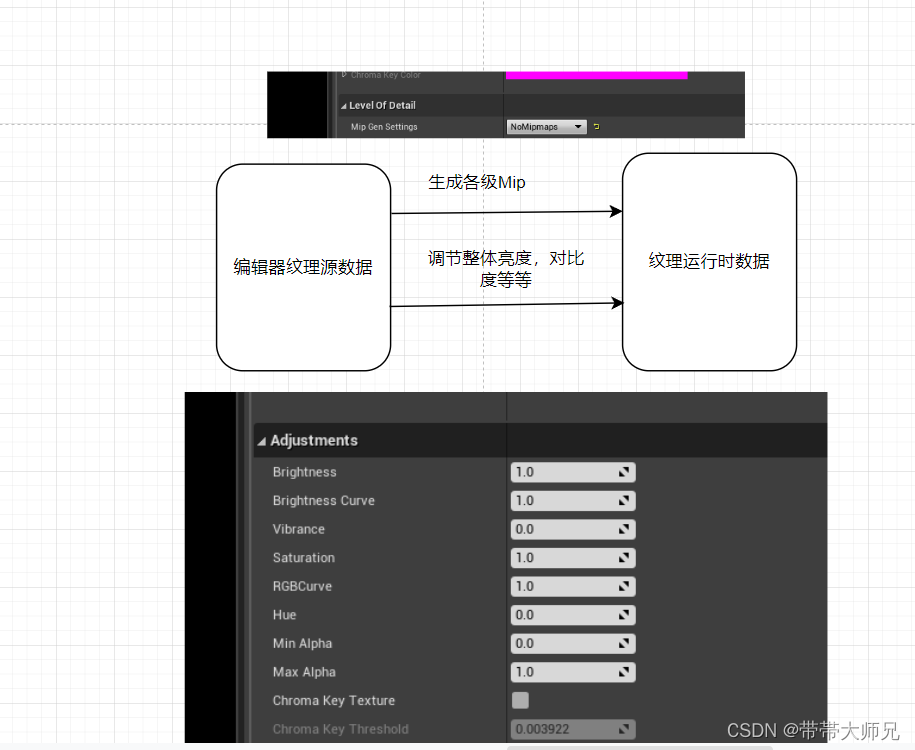
FTextureSouce存储了纹理的源数据(Color等等),这所谓纹理源数据,可以理解为一份外部导入,不可破坏的数据。或者说是编辑器数据.
//D:\UE_5.4\Engine\Source\Runtime\Engine\Classes\Engine\Texture.h
/*--------------------------------------------------------------------------
		Editor only properties used to build the runtime texture data.
	--------------------------------------------------------------------------*/

#if WITH_EDITORONLY_DATA
	/* Dynamic textures will have ! Source.IsValid() ;
	Also in UEFN , Textures from the cooked-only texture library.  Always check Source.IsValid before using Source. */
	UPROPERTY()
	FTextureSource Source;
#endif
可以看出纹理源数据只存在编辑时,最终Shipping打包出的项目是没这个东西。而且也可以在上面文章中 (复制:UE 实现复制 UTexture2D) 可以看到使用Source时使用了WITH_EDITORONLY_DATA宏
#if WITH_EDITORONLY_DATA
    NewTexture->Source.Init(
        InSizeX, InSizeY, 1, 1,
        FImageCoreUtils::ConvertToTextureSourceFormat(GetRawImageFormat(InFormat)), DstMipData);
#endif
但是纹理源数据是为了解决什么问题的?从注释上看,是为了创建运行时的纹理数据 (给材质Shader等情况使用的纹理数据). 假设不存在FTextureSource, 并且有个情况,我们需要调节纹理的对比度和亮度度等属性,第一次我们调亮度为了0.9,第二次我调亮度回到0.8. 第一次调节,假设原来为FColor(100, 100, 100), 则第一次调节后我们变为了FColor(90, 90, 90), 第二次变为多少?不知道,因为我们原始值已经变了,但是第二次调节亮度为0.8是相对于原始的,没了原始数据我们调节得到的颜色值根本无法知道,因此FTextureSource的作用是作为不可破坏的原始数据存在,Mip的生成都是遵从原始数据来的。Source不存在Mip或者说存在相当于第0级的Mip.
Texture2D的FTexturePlatformData
FTexturePlatformData确切来说就是运行时数据,后面UE的RenderThread的FTexture(对应于DX的SRV)就是靠FTexturePlatformData的各级Mip颜色数据(TIndirectArray<struct FTexture2DMipMap> Mips;)来填充创建的。
/**
 * Platform-specific data used by the texture resource at runtime.
 */
USTRUCT()
struct FTexturePlatformData
Texture的PrivateResource
PrivateResource就是我们在RenderThread使用的纹理资源,GameThread的UTexture2D在RenderThread的代表。 如果我们发现材质、UI等,需要用到SRV的情况下纹理上不正常甚至纹理相关的崩溃, PrivateResource是最优先Debug的。
//Texture.h
private:
	/** The texture's resource, can be NULL */
	class FTextureResource*	PrivateResource;
Texture2D的UpdateResource
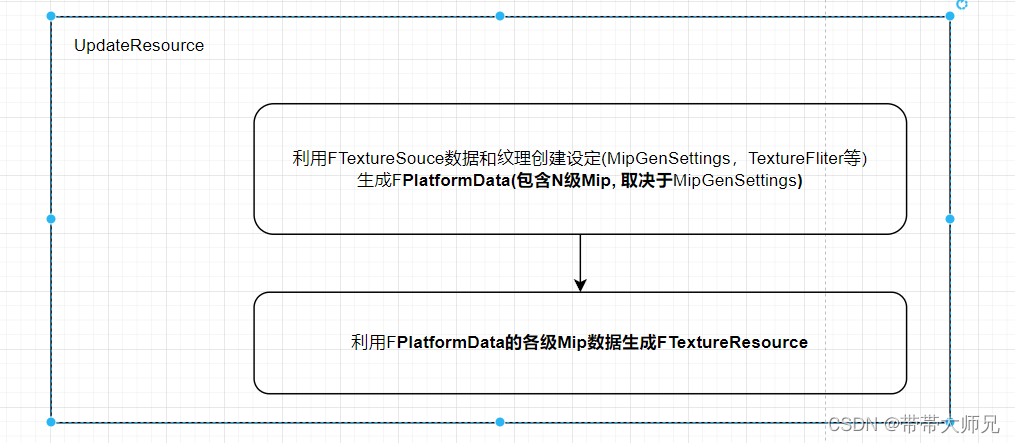
上面说到的FTextureSouce,FTexturePlatformData,FTextureResource三个概念。Texture2D给来一个接口把三个概念串联出来。
编辑器生成Texture2D
也就是纹理生成,我们只要建立FTextureSource数据,然后UpdateResource就可以得到FTexturePlatformData和FTextureResource,也就是说在编辑器生成纹理资源不需要手动填充FTexturePlatformData,而且哪怕手动填充FTexturePlatformData也会因为调用UpdateResource(手动在编辑器调节亮度,对比度, Mip生成设定等都会触发UpdateResource), 导致旧的FPlatfromData被新生成的FPlatfromData数据覆盖掉。
运行时使用Texture2D
使用的Texture2D是打包的游戏在运行时创建的(不打算保存为编辑器文件),并非DevelopmentEditor或者DebugEditor这些模式下,也就是Texture2D不存在FTextureSource,怎么办? 还是得看上面的UpdateResource, 渲染资源FTextureResource是由FPlatfromData生成的,此时我们直接手动填充FTexturePlatformData的各级Mip数据,然后UpdateResource就行了。顺便说下,UTexture2D已经提供来一个创建给完全运行时使用纹理的接口(只有一个Mip等级),但是手动填充FTexturePlatformData数据后,还得手动UpdateResource。